We love you, but we're not IN love with you

Category: HTML/CSS Page 1 of 3

Fix for Cordova error: Android target: not installed cmd: Command failed with exit code 1

I was trying to set up Cordova on my windows laptop this weekend. I followed all of the setup steps and ran

cordova requirements

but got this error:

Android target: not installed
avdmanager: Command failed with exit code 1 Error output: Exception in thread “main” java.lang.NoClassDefFoundError: javax/xml/bind/annotation/XmlSchema at com.android.repository.api.SchemaModule$SchemaModuleVersion.(SchemaModule.java:156) at com.android.repository.api.SchemaModule.(SchemaModule.java:75) at com.android.sdklib.repository.AndroidSdkHandler.(AndroidSdkHandler.java:81) at com.android.sdklib.tool.AvdManagerCli.run(AvdManagerCli.java:213) at com.android.sdklib.tool.AvdManagerCli.main(AvdManagerCli.java:200) Caused by: java.lang.ClassNotFoundException: javax.xml.bind.annotation.XmlSchema at java.base/jdk.internal.loader.BuiltinClassLoader.loadClass(BuiltinClassLoader.java:582) at java.base/jdk.internal.loader.ClassLoaders$AppClassLoader.loadClass(ClassLoaders.java:185) at java.base/java.lang.ClassLoader.loadClass(ClassLoader.java:496)

A quick google search turned up lots of ideas for fixing the issue, including:

  • Downgrading to JDK 8 (Don’t do this – it’s outdated advice)
  • setting the environment and PATH variables (I did that already)
  • reinstall the JDK (I tried this – no luck)
  • create an AVD (This needs to be done, but still didn’t solve my issue)

Here’s a link to a helpful Stack Overflow thread that goes through some of these options.

I work on a Macbook for my job and I’m not too familiar with Windows dev tools setup. I spent hours trying to sort this out. Then I realized that Windows has TWO places to set environment variables: One for USER variables and one for SYSTEM variables:

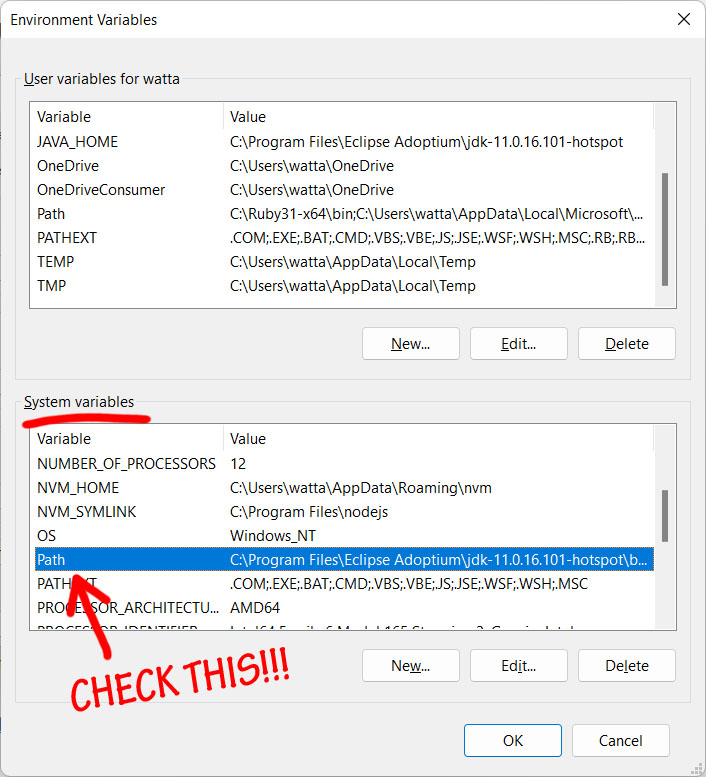
So, I started going through the system variables. When I opened up the system Path variable, I saw my problem:

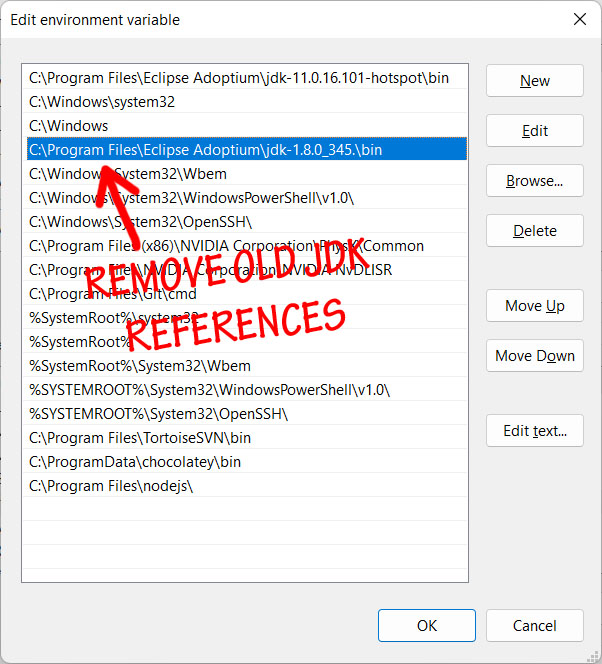
The JDK path was declared multiple times in the system variables. The image above is just an example – I actually had FOUR different JDK paths declared in my system path! Most of these paths pointed to non-existent JDKs. I removed all of the bad JDK paths, leaving only the path to the JDK I had just installed. Presto! My error went away!

Cordova requirements now threw a new error about not being able find ANDROID_SDK_ROOT, but that’s an easy fix. Just add a new User Environment variable called ANDROID_SDK_ROOT and give it the same value that you should already have for ANDROID_HOME.

As always, I hope that this saves you a little time and you won’t spend hours tracking down this issue like I did.

Moving a WordPress Site to a New Server

I recently had to install a copy of my wordpress site on localhost so I could test an upgrade without risking my live site. I used to do this a lot, but I’d forgotten the steps, so after I figured it out (again), I thought I should write it down…

Before starting: I moved my site to localhost. I run PHP/MySQL on localhost with XAMPP. I’m not going to provide a lot of details on every step. If you don’t know how to use XAMPP or phpMyAdmin, you’ll need to figure that out.

Step 1: Back everything up! Download all of your live site files to a local folder. Also, export your database. I export my database from the live site’s phpMyAdmin. Save the site files and database export somewhere that you won’t touch it. This is your fail-safe, just in case something really bad happens.

Step 2: Download all of your site files again. Yes, you COULD copy them from step 1, but that violates the principle of not touching your backup, so I don’t recommend it.

Step 3: Export your live site database again. You can copy your export from Step 1, but I think it’s a bad idea.

Step 4: Copy all of your site files to the new server. In my case, I created a wp_test folder in localhost/htdocs and pasted them in there.

Step 5: Open the wp-config.php file in in a code editor. It has info you’ll need for the next steps.

Step 6: Create a database on the new server. I did this through phpMyAdmin on localhost. This will be easier if you can give the new database the same name as the original (refer to DB_NAME in your wp-config file). If that’s not possible, don’t sweat it.

Step 7: Create a user for the new database. If possible, reuse the same user name and password as the old site (DB_USER and DB_PASSWORD in wp-config). Again, if your server won’t let you use these values, it’s no big deal. Generally, the hostname should be set to localhost. Since I was doing this on localhost, I gave the user full privileges, but if you’re moving it to another domain, you may need to be more careful about the privileges on your user. You can check the user account on the live site to see what permissions the user should have.

Step 8: Import the file from Step 3 into your new database.

Step 9: You need to open your wp_options table in the new database and modify the following entries:

  • site_url: change it to your new url. In my case: http://localhost/wp_test
  • home: same value as site_url

Step 10: If you were able to reuse your database and user info, you should be able to go to the site now. If you had to use a different user or database, change the values in your wp-config file to match the new values.

Step 11: You may need to fix some folder permissions tor things like image uploads to work correctly. Again, check the live site folder permissions for reference. NEVER use 777 permissions. 755 permissions should be what you need. That should do it! Check that you can click around your site and go to the admin panel. Things to watch out for:

  • Error establishing a database connection – means that your credentials in wp-config don’t match your actual user OR your MySQL server isn’t actually running.
  • 404s on the pages – see this post.
  • Pay attention to the URLs of the pages and admin panel. If you didn’t do step 9 correctly, it might direct you back to your original live site. It’s important to make sure you’re not on the live site before making changes.

Let me know if I missed anything important in the comments!

Kenny Login is Available Now!

Kenny Login version 1.0.0 releasedAfter months of procrastination and delays, I’m proud to officially release Kenny Login – a fully responsive HTML5 theme for your WordPress Login page. Version 1.0.0 is available now as a free WordPress plugin. Simply install the plugin and activate it through your admin panel. Blam! Kenny Loggins all up in your login page! Click here to get the lowdown.

Log in to the Danger Zone!

SOLVED: IntelliJ IDEA LESS compiler failure

intellij Idea less compiler failI use IntelliJ IDEA for all of my web development work – it’s simply the best web IDE on the market, but I ran into a weird problem with the built-in LESS compiler recently. I cloned a project from the Github repo and set it up in IntelliJ. Everything was going well until I tried to compile the LESS files. I was getting weird errors whenever I tried to compile any LESS files in the project. Errors like this:

LESS CSS Compiler Error
mobile.less: Name Error: variable @screen-sm-max is undefined (line 2, column 20) near @media (max-width: @screen-sm-max) {

(This is weird because this variable is defined correctly)

or this:

LESS CSS Compiler Error
styles.less: org.mozilla.javascript.UniqueTag@15923b2d: NOT_FOUND Error: java.io.IOException: No such file file:/Users/admin/Desktop/_CLIENTS/Website%20build/BUILD/GIT/_WEB/styles/bootstrap/bootstrap.less (line -1, column -1)

(This is weird because it’s failing to compile Bootstrap, which I know is fine)

There was obviously something wrong with my setup because it worked fine for other developers. I was getting these errors when I used the “Compile to CSS” function or when I set up a LESS file watcher. I upgraded my LESS version. I spent a lot of time trying a lot of different things until I stumbled across this obscure thread.

That’s right. You can’t have any whitespace in the file path. My mistake was that the project was located in this folder:
Desktop/_CLIENTS/Website build/BUILD/GIT
Notice the space in “Website build.” I changed to folder name to “Website_build” and it worked. Note that manually adding “%20” into the file watcher path doesn’t work – you absolutely can NOT have any spaces in the path. I was kind of shocked at this problem. I thought we had gotten over this issue 20 years ago. Anyway, I’ve learned my lesson. No more folders with whitespace in the names. If this saves someone else a little time, then my wasted time will be worth something.

Page 1 of 3

Powered by WordPress & Theme by Anders Norén