
One of the announcements at WWDC 2015 was that developers would be able to test apps on devices without a paid Apple developer account in XCode 7. I was just about to drop $99 on a developer account so I could test a personal project on my devices. So, I decided to dig in and figure out how to do this.
IMPORTANT NOTES BEFORE YOU START:
- You can’t do this if you have any developer accounts in XCode. This makes sense, really. If you have a developer account, then you can already test your projects on a device and you don’t need to do this.
- If you follow the steps below, your accounts will change across ALL versions of XCode on your Mac. So, if you need to keep your developer accounts in XCode 6, do NOT follow these steps.
Now that you’ve been properly warned about the ramifications, let’s get started…
Step 1: Download XCode 7 beta. Please note that XCode 7 beta is still pretty rough and you may need to go back to XCode 6 for certain things.
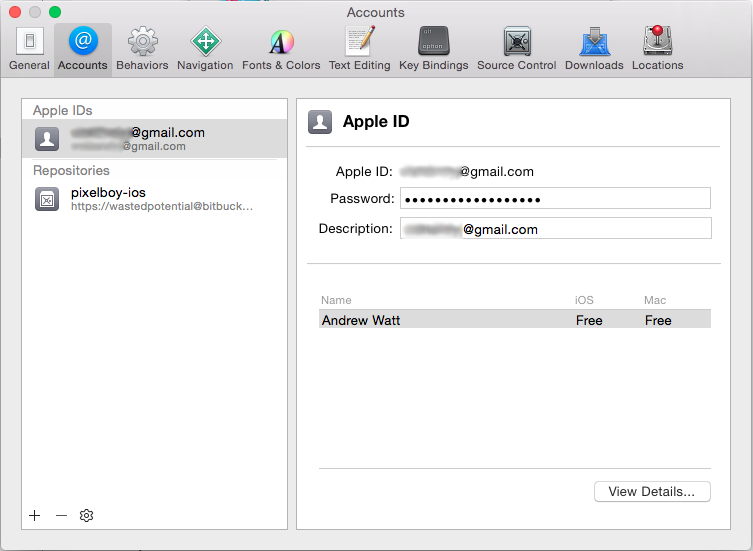
Step 2: Remove any developer accounts in Xcode. Open XCode Preferences and go to the accounts tab. You can’t have any accounts in here that are connected to any Apple Developer accounts. This means that you can’t have a paid developer account, but it also means that your Apple ID can’t be part of any free developer accounts (like Safari development). If there are any developer accounts in here, you need to delete them. The easiest thing to do is simply delete ALL of the accounts listed in here, then add them back in later as needed.
Notice how the Apple ID I’m using says “Free” under the iOS and Mac headings:
Step 3: Open an Xcode project and connect your device to your Mac.
Step 4: Check your project build settings. Choose your project target in your XCode project settings and go to the Build Settings tab. Make sure that your Code Signing is set to iOS Developer and your Provisioning Profile is set to automatic.

Step 5: set target device in XCode as shown:

Step 6: Run the app from Xcode
Step 7: Choose the account you want to use. If you deleted all of your accounts in step 2, you will be prompted to sign in with an Apple ID. Again, you must use an Apple ID that is not tied to a developer account.
Step 8: Apple may prompt you to fix issues with your certificate or provisioning profile. If this happens, click the “fix issue” button and let Xcode handle it for you.
If this process fails for any reason, here are some other things you can do:
- Open Keychain Access on your Mac and delete any development certificates in here. I had some old, expired certificates in my keychain and deleting them cleared up some problems.
- Go back to XCode preferences and check that the Apple ID you used is not connected to any developer accounts
- Worst case scenario: remove all accounts from Xcode preferences and create a brand new Apple ID with a new email address. This should force XCode to use a free account.
Just like any normal Xcode provisioning, it sometimes takes a little fiddling around to get it working. If you find any other tips, leave them in the comments.
Good Luck!
Taylor
Yahoo’s method turned out to be completely backwards.